


Loading...
Hi, How Can We Help You?
  • +91 9949062828
  • Address: Hyderabad | Bengaluru
  • Email Address: info@kernelmasters.com

Category Archives: Embedded Linux

July 25, 2026
THE QUESTION BEHIND THIS ARTICLE

Will AI Replace Linux Device Driver Engineers?

AI can generate code snippets, explain kernel errors and create basic driver templates. But making a driver work reliably on real hardware is still an engineering responsibility.

The short answer: No. AI can assist the engineer, but it cannot independently own hardware bring-up, debugging, integration and production validation.
AI Assistance≈5%Boilerplate, templates and explanations
Engineer Responsibility≈95%Hardware, debugging, integration and validation

Kernel Masters practical estimate based on training and hardware-development experience.

Short Answer: No.

AI is a powerful assistant, but Linux device driver development is not only about producing C code. The difficult work is understanding the hardware, integrating it with the kernel, measuring what is happening on a board, finding timing and memory problems, and validating the final system.

Artificial Intelligence is transforming many areas of software development. Today, AI tools can generate code snippets, explain kernel errors, and even create basic Linux driver templates within seconds.

This has led many students and professionals to ask an important question: “Will AI replace Linux Device Driver Engineers?”

The short answer is: No.

AI can help with a small portion of the work, but the majority of real-world Linux Device Driver development still depends on human engineers with strong hardware and debugging skills.

At Kernel Masters, based on our practical training and hardware-development experience, we estimate that AI can assist with roughly 5% of the overall work, while experienced engineers remain responsible for the remaining 95%.

AI accelerates Boilerplate, templates, explanations and repetitive coding tasks.
Engineers establish Hardware correctness, timing, integration, reliability and performance.
Production requires Evidence from documentation, measurement, testing and accountable review.

The Difference Between Writing C Code and Building a Working Driver

Many beginners think a Linux driver is just a C program.

In reality, a driver sits at the boundary between software and hardware.

A successful driver requires knowledge of:

  • Hardware architecture
  • Datasheets and errata
  • Interrupts and DMA
  • Device Tree integration
  • Power sequencing
  • Memory coherency
  • Kernel internals
  • Performance optimization
  • Real hardware debugging
  • Validation and reliability
The critical distinctionAI can generate generic driver-shaped code. A working driver must match a specific device, SoC, board design, kernel configuration and real operating conditions.

The 4 Main Reasons AI Cannot Write a 100% Working Linux Device Driver

1

Hardware Datasheets and Errata Contain Critical “Secret” Knowledge

Every embedded processor, camera sensor, NPU, SPI device, or I²C peripheral comes with large technical documentation.

Indicative documentation ranges: actual document volume varies by vendor, device family and product maturity.

Hardware Type Typical Documentation Size
Microcontrollers 500–1500 pages
Application processors 2000+ pages
Camera sensors 800–2000 pages
NPUs / AI accelerators 1000–3000 pages

The most important information is often not obvious. A vendor may include a device-specific note such as:

Illustrative exampleSet register 0x43, bit 3, before enabling DMA; otherwise the system may hang.

Such requirements may appear in hardware errata sheets, vendor application notes, internal engineering documents or NDA-protected updates.

Why AI Fails Here

AI can only reason from the technical information made available to it. It may not have access to confidential errata, vendor support history, internal workarounds or proprietary initialization sequences.

As a result, AI may generate code that looks correct but fails on real hardware.

What Human Engineers Do

  • Read hundreds of pages of documentation
  • Identify hidden initialization requirements
  • Compare datasheet and errata revisions
  • Test different register sequences
  • Validate behaviour on actual boards

This is a hardware engineering task, not just a coding task.

2

Real Hardware Debugging Cannot Be Automated by AI

A driver does not operate in isolation. It interacts with interrupt controllers, DMA engines, caches, clocks, power domains and external peripherals.

Many failures are caused by timing, ordering or hardware-state problems.

Hypothetical timing-sensitive C example
/* Interrupt arrives */
irq_handler();

/* Device-specific interrupt acknowledge */
writel(IRQ_CLEAR, base + STATUS_REG);

/* On some non-coherent streaming DMA paths,
 * synchronize before CPU access when required. */
dma_sync_single_for_cpu(dev, dma_addr, size, direction);

If the sequence or timing is wrong, the interrupt may repeat forever, DMA data may be corrupted, the kernel may crash intermittently, or the board may freeze only once every few hours.

How Engineers Debug This

Physical instruments

  • Oscilloscope
  • Logic analyzer
  • JTAG debugger
  • UART console
  • Power measurement tools

Kernel-level tools

  • Dynamic debug and kernel logs
  • Ftrace and tracepoints
  • KGDB / GDB where appropriate
  • KASAN, lockdep and fault reports
  • Subsystem-specific debug facilities

An engineer may need to measure an SPI clock, verify reset pulse width, check whether an interrupt line toggles, confirm DMA completion timing or observe power sequencing.

Why AI cannot replace this responsibilityAI cannot independently validate hardware that it cannot physically observe, control or reproduce. Without board access, schematics, measurements and instrument data, it cannot confirm what is happening electrically.

This is why debugging skills remain one of the most valuable abilities in embedded Linux development.

3

Every Board Requires Custom Integration

A common misconception is: “If the driver works on one board, it will work on another.”

A reusable driver may work across several boards, but every board still requires correct hardware description, resource configuration and validation.

Device Tree Problems

A driver may fail simply because the Device Tree is wrong.

Device Tree example
&spi1 {
    status = "okay";
    pinctrl-0 = <&spi1_pins>;
};

A single incorrect pinmux setting can prevent the device from being created or the driver from binding correctly.

Power Sequencing Problems

Many peripherals require a strict sequence:

Example sequence3.3 V ON → 1.8 V ON → wait 5 ms → release RESET → enable clock

If the order is wrong, the device may not respond, the sensor may remain in reset, or—in poorly protected hardware—components may be stressed or damaged.

Memory Architecture Problems

DMA behaviour depends on whether memory is coherent, non-coherent, IOMMU-mapped, cached or non-cached. The correct implementation depends on the SoC, device and board design.

What Human Engineers Must Understand

  • Board schematics
  • Power rails
  • Clock trees
  • Reset circuits
  • GPIO routing
  • Memory architecture
  • Kernel configuration
  • Firmware description

AI does not know the complete behaviour of a custom board unless the relevant design information, constraints and measurements are supplied—and even then, the result must be verified on hardware.

4

Safety and Liability Require Human Responsibility

Imagine drivers used in automotive ADAS systems, medical equipment, aerospace electronics or industrial robots. A single bug can have serious consequences.

Car camera driverLoss or corruption of perception data
Medical imaging deviceIncorrect or missing diagnostic information
Industrial controllerUnsafe behaviour or equipment damage
Aerospace sensor driverLoss of critical system information

Responsible engineering teams will not release production driver code without human review, hardware validation, testing and accountable sign-off.

The Required Engineering Process

  • Code review
  • Hardware validation
  • Stress testing
  • Performance testing
  • Safety analysis
  • Documentation
  • Regression testing
  • Engineering sign-off

A human engineer must take responsibility for the final result.

What AI Can Actually Help With (≈ 5%)

AI is still useful. It can accelerate repetitive work and help engineers navigate information faster.

  • Generate boilerplate probe/remove structures
  • Create Device Tree node templates
  • Explain common kernel errors
  • Suggest register read/write helpers
  • Summarize supplied datasheet sections
  • Convert vendor code into cleaner Linux-style code
  • Draft test checklists and documentation
  • Compare patterns in existing drivers
Illustrative platform-driver boilerplate
static int my_probe(struct platform_device *pdev)
{
    /* Acquire resources and initialize the device */
    return 0;
}

static void my_remove(struct platform_device *pdev)
{
    /* Release resources not managed automatically */
}

This saves time, but it is only a small part of the complete project. Kernel APIs also evolve, so generated examples must always be checked against the target kernel version and subsystem documentation.

What Human Engineers Still Do (≈ 95%)

≈5%

AI Assistance

  • Templates
  • Boilerplate
  • Explanations
  • Documentation support
≈95%

Engineer Responsibility

  • Understand hardware architecture
  • Read datasheets and schematics
  • Debug real hardware
  • Analyze interrupts and DMA
  • Fix races and lifetime bugs
  • Optimize and validate reliability

These are the skills companies pay for.

The Most Valuable Skill: Hardware Debugging

The future of embedded Linux belongs to engineers who can answer questions such as:

  • Why is the interrupt not triggering?
  • Why is DMA returning corrupted data?
  • Why does the board hang during boot?
  • Why does the camera work only after reset?
  • Why is performance limited to 10 FPS instead of 30 FPS?
  • Why does suspend/resume fail only after repeated cycles?

These problems cannot be solved by copying code from the internet. They require observation, measurement, experimentation, reasoning and experience.

AI can suggest possibilities. The engineer must collect evidence, isolate the failure and prove the fix.

Why We Teach Real Hardware at Kernel Masters

At Kernel Masters, we focus on industrial embedded Linux training.

Students work with real development boards, oscilloscopes, logic analyzers, Linux kernel source code, Device Tree, U-Boot, custom drivers and performance profiling tools.

Our goal is not to create “code generators.”

Our goal is to create engineers who can bring up hardware, debug systems, and build real embedded products.

Final Takeaway

AI Is a Powerful Assistant—Not a Replacement for Embedded Linux Engineers

Remember this simple rule:

AI ≈ 5%

Boilerplate code, templates and explanations.

Engineers ≈ 95%

Hardware understanding, debugging, integration, optimization and validation.

The companies that build automotive systems, AI cameras, robotics platforms, medical devices and industrial products are not looking for people who can merely generate code.

They are looking for engineers who can understand hardware, debug complex systems, solve problems under pressure and deliver reliable products.

The Future Belongs to Engineers Who Can Debug Hardware—Not Just Write Code.

Kernel Masters

Industrial Embedded Linux and Linux Device Driver Training.
We Build Engineers, Not Just Programmers.

Explore Training

September 18, 2024

The Linux community World wide contains many students who are developing the code either out of Interest or as part of their academic projects.

But most of the colleges doesn’t have the proper environment suitable for Open Source Projects (Except for top most colleges like IITs/NITs). The students in those colleges don’t get any guidance on how to start with open source projects.

That is what we are implementing in our course, “Android for Embedded Systems” where we are going to make students do some real-time projects that are based on Linux / Android open source code.We also have academic projects for B.Tech / M.Tech students that are purely based on Linux / Android open source code.

September 18, 2024
September 18, 2024

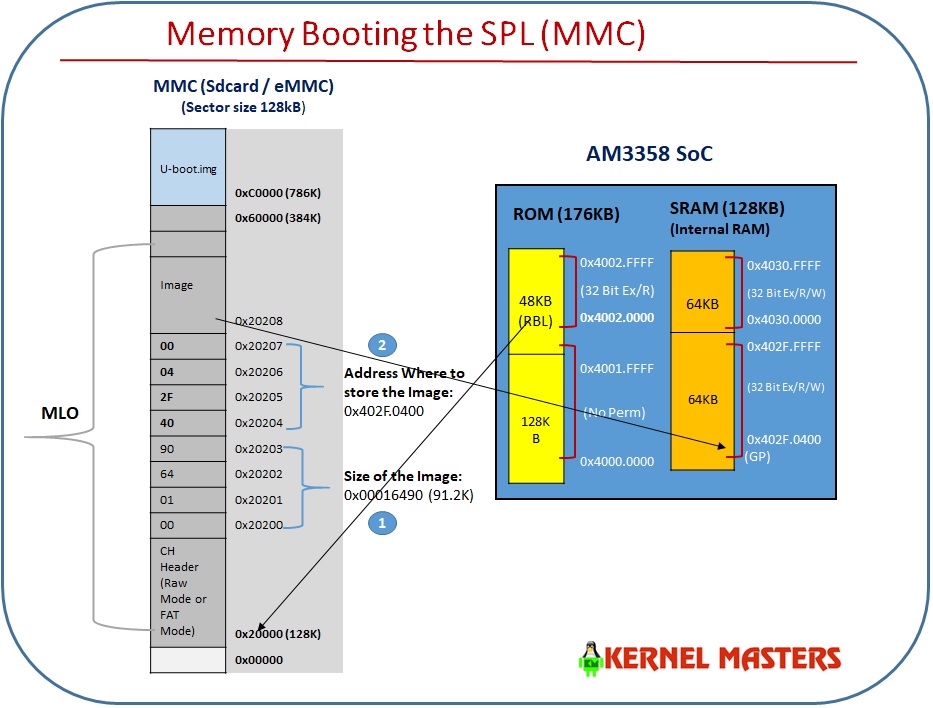
In AM335x the ROM code serves as the bootstrap loader, sometimes referred to as the Initial program Loader (IPL) or the Primary Program Loader (PPL) or ROM Program Loader (RPL).

The booting is completed in two consecutive stages by U-Boot binaries.

  1. The binary for the 1st U-Boot stage is referred to as the Secondary Program Loader (SPL) or the MLO.
  2. The binary for the 2nd U-Boot stage is simply referred to as U-Boot. SPL is a non-interactive loader and is a specially built version of U-Boot. It is built concurrently when building U-Boot

Memory Booting: Booting the device by starting code stored on permanent memories like flash-memory or memory cards. This process is usually performed after either device cold or warm reset.
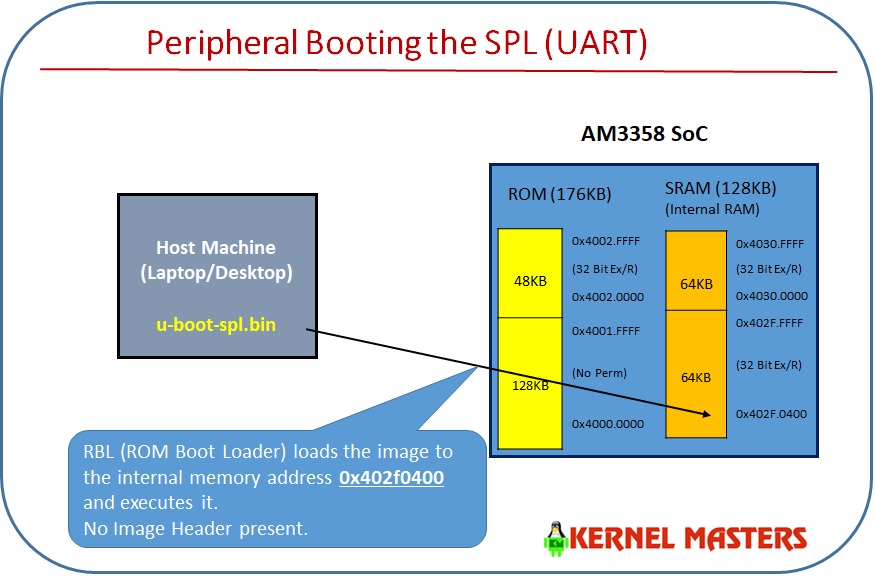
Peripheral Booting: Booting the device by downloading the executable code over a communication interface like UART, USB or Ethernet. This process is intended for flashing a device.

Booting the SPL

The ROM code can load the SPL image from any of the following devices:

  1. Memory booting with MMC
  2. Peripheral booting with UART

1. Memory Booting with MMC

The image should have the Image header. The image header is of length 8 byte which has the load address (Entry point) and the size of the image to be copied. RBL would copy the image, whose size is given by the length field in the image header, from the device and loads into the internal memory address specified in the load address field of Image header.

When using memory boot a header needs to be attached to the SPL binary indicating the load address and the size of the image. SPI boot additionally requires endian conversion before flashing the image

The ROM Code supports booting from MMC / SD cards in the following conditions:

  • MMC/SD Cards compliant to the Multimedia Card System Specification and Secure Digital I/O Card Specification of low and high capacities.
  • MMC/SD cards connected to MMC0 or MMC1.
  • Support for 3.3/1.8 V on MMC0 and MMC1.
  • Initial 1-bit MMC Mode, optional 4-bit mode, if device supports it.
  • Clock Frequency: identification mode: 400 KHz; data transfer mode up to 10 MHz.
  • File system mode (FAT12/16/32 supported with or without Master Boot Record), image data is read from a booting file.
  • Raw mode, image data read directly from sectors in the user area.
    • In raw mode the booting image can be located at one of the four consecutive locations in the main area offset 0x0 / 0x20000 (128KB) / 0x40000 (256KB) / 0x60000 (384KB).

2. Peripheral Booting with UART

RBL loads the image to the internal memory address 0x402f0400 and executes it. No Image Header present.

When using peripheral boot (UART) there can be no header as the load address is fixed.

The ROM Code supports booting from UART in the following conditions:

  • UART boot uses UART0.
  • UART0 is configured to run at 115200 baud, 8-bits, no parity, 1 stop bit and no flow control.
  • UART boot uses x-modem client protocol to receive the boot image.
  • Utilities like hyperterm, teraterm, minicom can be used on the PC side to download the boot image to the board.
  • With x-modem packet size of 1K throughout is roughly about 4KBytes/Sec.
  • The ROM code will ping the host 10 times in 3s to start x-modem transfer. If host does not respond, UART boot will timeout.
  • Once the transfer has started, if the host does not send any packet for 3s, UART boot will time out.
  • If the delay between two consecutive bytes of the same packet is more than 2ms, the host is requested to re-transmit the entire packet again.
  • Error checking using the CRC-16 support in x-modem. If an error is detected, the host is requested to re-transmit the packet again.

Bootloader Images:

Image Name Image Size Image Header Purpose
spl/u-boot-spl 2.2M No The binary of SPL ELF Image.
spl/u-boot-spl.bin 91264 Bytes No The second-stage bootloader (a stripped down version of u-boot that fits in SRAM).
spl/u-boot-spl.map 227K No contains the information for each symbol.
MLO 91784 Bytes Yes, GP Header spl/u-boot-spl.bin with a GP image header prepended to it.
U-boot.bin 474K No is the binary compiled U-Boot bootloader
u-boot.map 674K No contains the memory map for each symbol
U-boot.img 474K Yes. GP header contains u-boot.bin along with an additional header to be used by the boot ROM to determine how and where to load and execute U-Boot.
September 18, 2024

Use this guide to prepare your Linux development environment, find course resources and move into BeagleBone Black practicals when Level 2 begins. Follow your instructor’s batch-specific directions for hardware and builds.

01

Prepare your computer for Level 1

Level 1 covers Linux basics, shell scripting, Linux System Programming and driver foundations. No development board is required at this stage.

Install now

Set up Kernel Masters OS

The official installation guide covers laptop requirements, KM OS version selection, VirtualBox, the matching Extension Pack, import, troubleshooting and first-boot checks.

After installation

  1. Open the KM OS desktop and terminal.
  2. Verify internet access inside the VM.
  3. Check Git, GCC and Make.
  4. Create a clean snapshot after verification.

Course prerequisite: C Programming and Data Structures. The playlists below are helpful Linux primers to study alongside your C preparation.

02

Build your foundations with free primers

Watch these public Kernel Masters playlists and practice the examples in your KM OS terminal. Course assignments and the batch learning sequence will be shared separately.

03

Prepare and test your Level 2 hardware

Level 2 moves into BeagleBone Black practice, the KM expansion board, bootloader and BSP work, kernel customization, drivers, Yocto, debugging and projects. Both boards are required for the practicals; the BeagleBone Black may need to be purchased separately.

Required board test

Test the board when it arrives

Complete the BeagleBone Black and KM expansion board diagnostic test using the procedure shared by the KM team. Report any fault through the official support channel before moving to other board experiments.

Board diagnostic walkthrough

04

Level 2 build instructions

The existing KM-BBB U-Boot and kernel steps are kept here for this release. Use the versions and workflow confirmed by your instructor for your batch.

Before installing to an SD card: Confirm the correct /dev/sdX device. Choosing another disk can overwrite its data. Complete the required board test first.

U-Boot 2019.04 — source, build and install

1. Download the source

cd ~/KM_GITHUB/
git clone https://github.com/kernelmasters/beagleboneblack-uboot.git
cd beagleboneblack-uboot

2. Configure and build for KM-BBB

km-bbb-uboot-build.sh

The existing guide identifies the generated boot images as MLO and u-boot.img. It describes u-boot.bin as the compiled U-Boot binary.

3. Install using your instructed method

SD card:

./km-bbb-uboot-install.sh --mmc /dev/sdX

Network (TFTP):

./km-bbb-uboot-install.sh --board X

Replace X only after verifying the SD-card device or KM-BBB board number.

Kernel 4.19.94 — source, build and install

1. Download the source

cd ~/KM_GITHUB/
git clone git@github.com:kernel-masters/beagleboneblack-kernel.git
cd beagleboneblack-kernel

2. Configure and build for KM-BBB

km-bbb-kernel-build.sh

The existing guide identifies vmlinux as a generated image and lists vmlinuz, device-tree blobs and modules for SD-card installation.

3. Install using your instructed method

SD card:

./km-bbb-kernel-install.sh --mmc /dev/sdX

Network (TFTP):

./km-bbb-kernel-install.sh --board X

These commands are reproduced from the existing article. Confirm the kernel repository path and versions with your instructor.

05

Your code and learning resources

Keep the official source library and your course dashboard easy to find throughout both levels.

Kernel Masters GitHub

Explore public Embedded Linux, BeagleBone Black, U-Boot, kernel and related project repositories. Use the revision your instructor specifies for your module.

KMLearnX learning portal

Use your assigned account for course materials and progress information.

  • Recorded concept lessons, per course policy
  • Class notes and lab assignments
  • Attendance records
  • Grades and performance reports

Login credentials are shared during an upcoming online interactive session. Interactive-session recordings are not part of standard course delivery; follow your batch policy.

06

Readiness checklist and support

Prepare your learning environment first. Complete the board test and confirm the build workflow when Level 2 hardware work begins.

Before Level 1 practicals

  • KM OS installed from the official guide
  • Desktop, terminal and internet verified
  • Git, GCC and Make checked
  • C and Data Structures reviewed
  • Primers and KMLearnX bookmarked

Before Level 2 practicals

  • Level 1 foundations completed
  • BeagleBone Black and KM expansion board available
  • Required board test completed
  • Instructor’s build versions confirmed
  • SD-card device or board number verified

Need help with setup or board testing?

Contact the KM team through the official student WhatsApp channel using your registered number, or email your batch details, exact error and a screenshot.

🚀 Admission for 6 months Embedded AI & IoT offline course at Hyderabad & Bangalore
🚀  Admission for 6 months Embedded AI & IoT offline course at Hyderabad & Bangalore
1s
C Programming & Data Structures
Working Professional
🕮 Kishore Kumar Boddu | 【┘】 2 Months
About This Course

This course is designed for working professionals who want to build a strong foundation in C Programming and Data Structures.
Starting from the fundamentals, the course focuses on practical programming, problem solving, pointers, strings, memory concepts and core data structures — helping learners strengthen their programming skills and prepare confidently for technical interviews.

Course Objective
  • Build in-depth knowledge of C Programming from the fundamentals
  • Gain hands-on experience with core C programming features
  • Develop a strong understanding of pointers, strings, arrays and memory concepts
  • Improve problem-solving and programming skills
  • Become interview-ready for C Programming technical rounds
  • Implement Data Structures using C
Course Details:
  • Batch Starts: 1st Oct 2026
  • Duration: 2 Months
  • Class Timings: 7 PM – 8:30 PM
  • Mode: 100% Online Blended Learning
         (Online Interactive Session + Primer Videos)
  • Prerequisite: Basic Linux knowledge and familiarity with common terminal commands
👉 Course Fee: ₹12000 /-
Working Professional
C Programming & Data Structures
🕮 Kishore Kumar Boddu  |【┘】2 Months
About This Course:
This course is designed for working professionals who want to build a strong foundation in C Programming and Data Structures.
Starting from the fundamentals, the course focuses on practical programming, problem solving, pointers, strings, memory concepts and core data structures — helping learners strengthen their programming skills and prepare confidently for technical interviews.
Course Objectives:
  • 1. Build in-depth knowledge of C Programming from the fundamentals
  • 2. Gain hands-on experience with core C programming features
  • 3. Implement Data Structures using C
  • 4. Improve problem-solving and programming skills
  • 5. Develop a strong understanding of pointers, strings, arrays and memory concepts
  • 6. Become interview-ready for C Programming technical rounds
  • Duration: 2 Months
  • Class Timings: 7 PM – 8:30 PM
  • Mode: 100% Online Blended Learning
    (Online Interactive Session + Video Primers)
  • Prerequisite: Basic experience with Linux
Course Details:
Course Fee:
₹12000 /-