C Programming Skills (Function, Pointers, Arrays, and Structures, Bit-wise operations should be your best friends). Master C programming skill. This is the most essential skill for the ECE students today. Without this skill you will find it difficult to enter into electronics core companies.
Embedded C Programming (Microcontroller Programming)
Operating Systems Concepts (Process Management, File Management, Memory Management, Inter Process Communication)
Linux Basics/Commands
Work on Community development boards.
Resources
C in Depth by Srivastava and The C Programming Language by K & R
Understand the Digital Circuit thoroughly from AND, OR, NOT gates to Microprocessors.
Resources:
Computer organization by Morris Mano
Digital Systems by Morris Mano
8086 microprocessor interfacing
Project Work:
Buy a Community development board and apply the C programming skill to do good electronic projects by yourself without copying a single line of code from net/book/friends.
ARM cores are designed specifically for embedded systems. The needs of embedded systems can be satisfied only if features of RISC and CISC are considered together for processor design. So ARM architecture is not a pure RISC architecture. It has a blend of both RISC and CISC features.
ARM Architecture Features and Benefits:
Features
Benefits to embedded system
High Performance
Ensures the system has a fast response
Low power consumption
Makes the system more energy efficient
Low silicon area
Reduces the size and also consumes less power
High Code density
Helps embedded system to have less memory footprint
Load/store architecture
Used to load data from the memory to the ARM CPU register or store data
from the CPU register to the memory; enables the memory access when
required
Register bank with large number
of working registers
Required to perform most of the operations within the CPU and provides
faster context switch in a multitasking applications
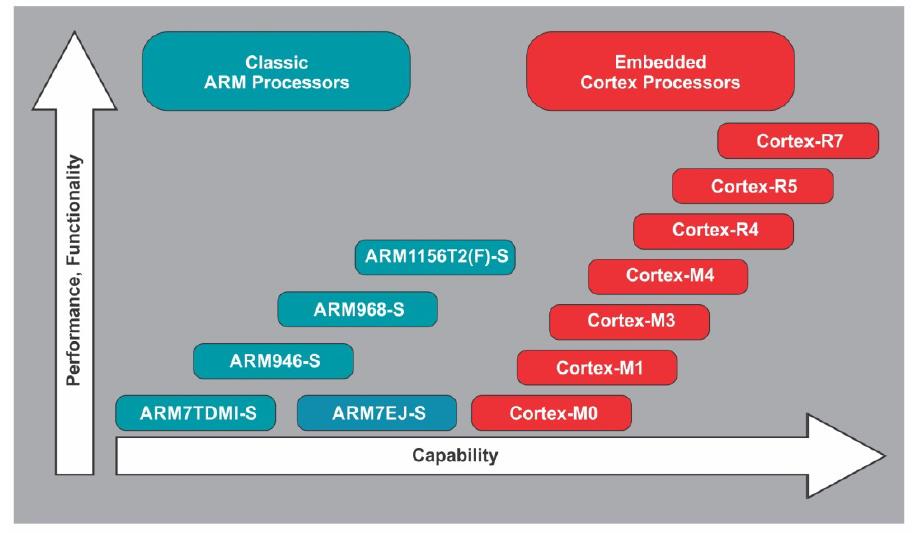
In the path of architectural evolution, ARM has contributed many versions of IP cores to the embedded computing world. ARM pioneered embedded products are excelling in every visible spectrum. Since its inception, ARM has migrated over a long meaningful road map starting from v4T ARM7TDMI to v7 Cortex series of architectures achieving many strong milestones in between. It is currently the new era of feature rich ARM Cortex series architectures truly empowering the embedded computing world.
ARM architecture evolution:
Performance and capability comparison of ARM7, ARM9, ARM11 series processors with Cortex-M and Cortex-R embedded cores
ARM architecture v7 profile:
In order to provide a wide coverage of different application domains, addressing their specific requirements, ARM core is evolved into architecture version7 which has three different profiles: the application profile, real time profile and microcontroller profile. Architecture v7 should not be confused with ARM7 which has been explained before under architecture v4.
Application profile (Cortex -A)
Cortex A series of architectures are multicores with power efficiency and high performance. Every Cortex – A implementation is intended for highest performance at ultralow power design. It supports with, in-built memory management unit. Being influenced by multitasking OS system requirements, it has virtualization extensions and provides a trust zone for a safe and extensible system. It has enhanced Java support and provides a secure program execution environment. These architectures are typically designed for high end real time safety critical applications like automotive powertrain system. Some Cortex- A application products are smart phones, tablets, televisions and even high end computing servers.
Real-time profile (Cortex -R)
Cortex R series of architectures are designed for deeply embedded real time multitasking applications. They have low interrupt latency and predictability features for real time needs. It provides memory protection for supervisory OS tasks being in privileged mode. It also provides tightly coupled memories for fast deterministic access. Typical application examples are: hard disk drive controller and base band controller for mobile applications and engine management unit where high performance and reliability at very low interrupt latency and determinism are critical requirements.
Microcontroller profile (Cortex -M)
Cortex M series of architectures have v6-M as cortex M0, M0+ and M1 and v7-M with Cortex M3, M4 and other successors. This series of architectures developed for deeply embedded microcontroller profile, offer lowest gate count so smallest silicon area. These are flexible and powerful designs with completely predictable and deterministic interrupt handling capabilities by introducing the nested vector interrupt controller (NVIC). The small instruction sets support for high code density and simplified software development. Developers are able to achieve 32-bit performance at 8-bit price. The very low gate count of Cortex M0 facilitates its deployment in analog and mixed mode devices. Due to further demanding applications requiring even better energy efficiency, Cortex M0+ was designed with two stage pipeline and achieved high performance with very low dynamic power consumption, reduced branch shadow and reduced number of flash memory access. Cortex M1 was designed for implementation in FPGA. It is functionally a subset of Cortex M3 and runs ARM v6 instruction set with OS extension options. It has 32-bit AHB lite bus interface, separate tightly coupled memory interface and JTAG interface to facilitate debug options. It has three stage pipeline implementation and configurable NVIC for reducing interrupt latency.
Cortex M4 Features:
Thumb2 instruction set delivers the significant benefits of high code density of Thumb with
32-bit performance of ARM.
Optional IEEE754-compliant single-precision Floating Point Unit.
Code-patch ability for memory system updates.
Power control optimization by integrating sleep and deep sleep modes.
Hardware division and fast multiply and accumulate for SIMD DSP instructions.
Saturating arithmetic for noise cancellation in signal processing.
Deterministic, low latency interrupt handling for real time-critical applications.
Optional Memory Protection Unit(MPU) for safety-critical applications
Extensive implementation of debug, trace and code profiling capabilities.
ARM Cortex M Programming Model:
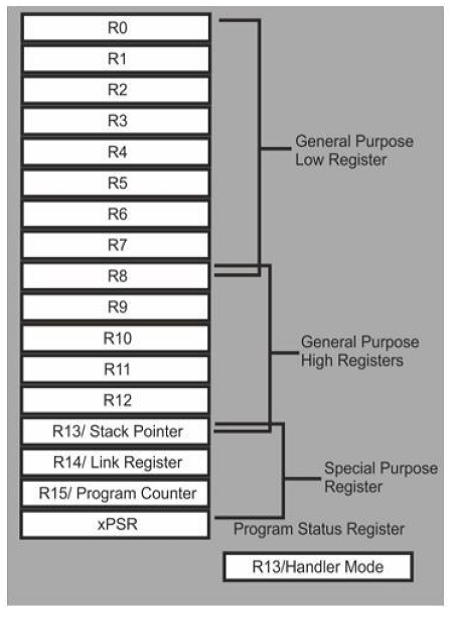
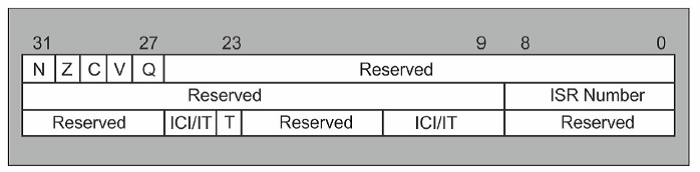
The programming model of the Cortex-M4 processors has 18 working registers shown in below Figure. Thirteen of them are general purpose 32-bit registers, three have special uses and two stack pointers.
Visual overview of ARM processor registers showing R0–R12 general purpose registers, special purpose registers R13–R15, and xPSR status registerDetailed breakdown of the ARM processor status register showing key flags and reserved bits crucial for system-level programming
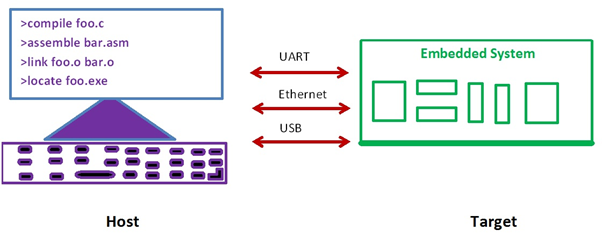
Embedded software build process is a transformation performed by software running on a general purpose computer.
The compiler, assembler, linker and locator are all pieces of software that run on a host computer, rather than on the embedded system itself. Finally executable image run on a target embedded system.
Host (Development) machine communicate to the target various types of interfaces like UART, Ethernet and USB.
Types of computer architectures
Based on Program Memory and Data Memory (Harvard and Von Neumann computer architectures)
Based on Mechanism (RISC and CISC)
Based on Data transfer to the Memory (Little Endian and Big Endian)
Based on Types of Address (I/O mapped I/O and Memory Mapped I/O)
Based on Instruction Set
Harvard and Von Neumann computer architectures
Embedded deviceVON NEUMANN ARCHITECTURE
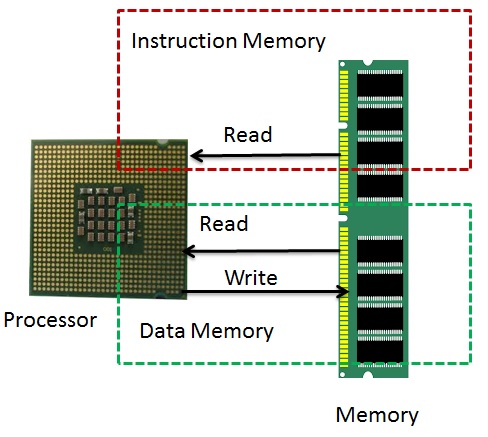
It is named after the mathematician and early computer scientist John Von Neumann. The computer has single storage system memory) for storing data as well as program to be executed.
There is no real difference between data and instructions.
Data and instructions share the same memory.
Processor needs two clock cycles to complete an instruction. Pipelining the instructions is not possible with this architecture.
In the first clock cycle the processor gets the instruction from memory and decodes it. In the next clock cycle the required data is taken from memory. For each instruction this cycle repeats and hence needs two cycles to complete an instruction
Harvard Architecture
The name is originated from “Harvard Mark I” a relay based old computer.
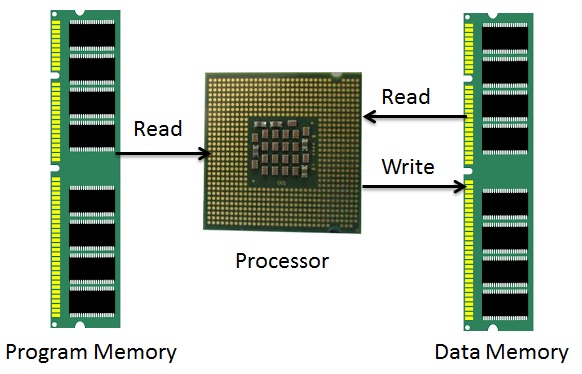
The computer has two separate memories for storing data and program.
Processor can complete an instruction in one cycle if appropriate pipelining strategies are implemented. In the first stage of pipeline the instruction to be executed can be taken from program memory. In the second stage of pipeline data is taken from the data memory using the decoded instruction or address.
Most of the modern computing architectures are based on Harvard architecture. But the number of stages in the pipeline varies from system to system.
RISC and CISC:
CISC
RISC
Many complex instructions
Simple instructions, few in Number, Few addressing modes
Variable length instructions
Fixed length instructions
Many instructions can access memory
Only LOAD/STORE instructions access
memory
mov ax, 10
mov bx, 5
mul bx, ax
mov ax, 0
mov bx, 10
mov cx, 5
Begin add ax, bx
loop Begin
The total clock cycles for the CISC version might be:
(2 movs × 1 cycle) + (1 mul × 30 cycles) = 32 cycles
While the clock cycles for the RISC version is:
(3 movs × 1 cycle) + (5 adds × 1 cycle) + (5 loops × 1 cycle) = 13
cycles
Example: x86 ISA
Examples: ARM, MIPS, PowerPC (IBM), SPARC (Sun)
Little Endian and Big Endian
Little Endian
Big Endian
“Little Endian” means that the lower-order byte of the number is stored in memory at the lowest address, and the high-order byte at the highest address.
“Big Endian” means that the high-order byte of the number is stored in memory at the lowest address, and the low-order byte at the highest address.
For example, a 4 byte Integer
Byte3 Byte2 Byte1 Byte0
will be arranged in memory as follows:
Base Address+0 Byte0
Base Address+1 Byte1
Base Address+2 Byte2
Base Address+3 Byte3
The same 4 byte integer would be stored as:
Base Address+0 Byte3
Base Address+1 Byte2
Base Address+2 Byte1
Base Address+3 Byte0
Intel processors (those used in PC’s) use “Little Endian” byte order.
ARM processors (those used in PC’s) use “Big Endian” byte order.
I/O mapped I/O and Memory Mapped I/O:
I/O Mapped I/O
Memory Mapped I/O
Separate address bus for I/O and memory.
Common address bus for I/O and Memory.
Support IN and OUT Assembly Instructions.
There are no separate IN & OUT instructions. What are the instructions are to communicate memory same instructions useful to communicate I/O.
Separate control lines for I/O. IOR and IOW
No separate control Lines for I/O. Memory control lines only MEMR, MEMW.
Register Plus Memory Architecture and Load Store Architecture
Register Plus Memory
Load Store Architecture
Allows operations to be performed on (or from) memory, as well as registers.
If the architecture allows all operands to be in memory or in registers, or in combinations, it is called a “register plus memory” architecture.
load/store architecture divides instructions into 2 categories:
• Memory access (load and store between memory and registers).
• ALU operations (which only occur between registers).
Example: ADD M ; A <- A + [M
Example: ADD r3,r2,r1
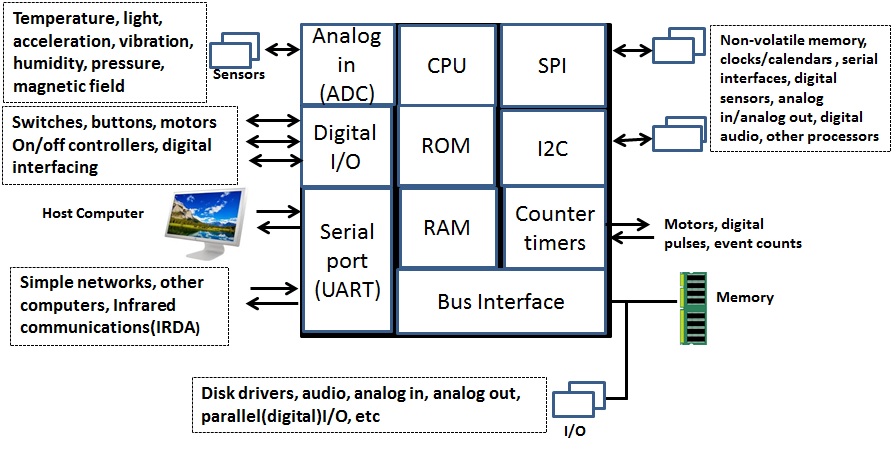
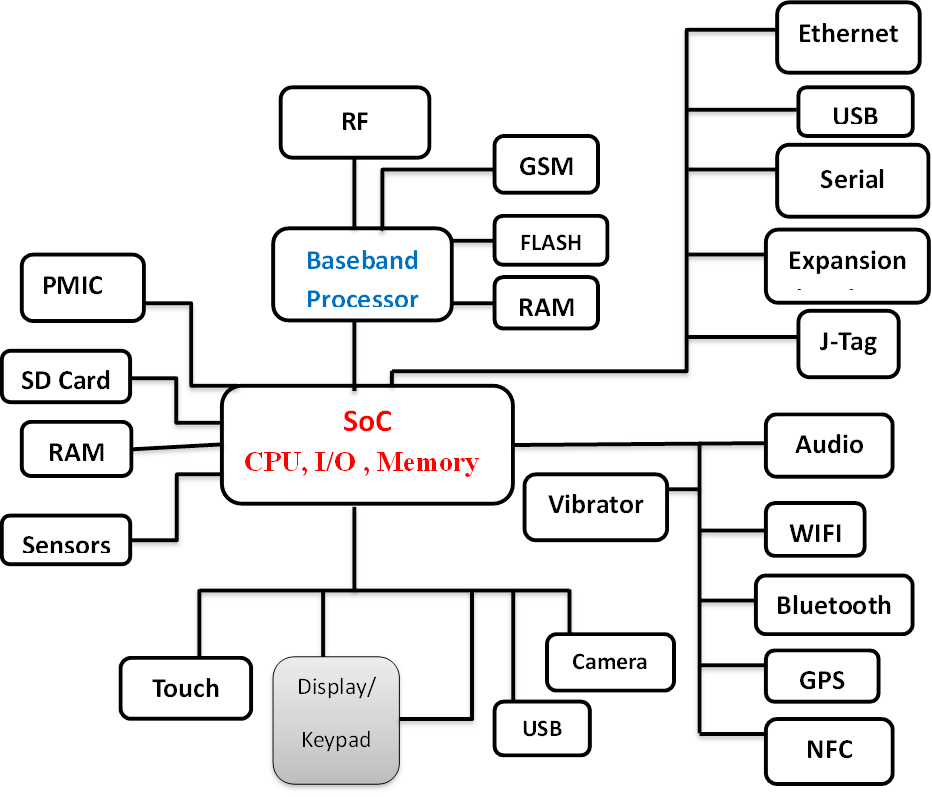
Embedded Hardware
Hardware Required
Desktop Computer
Simple Embedded
Computer
Ex: remote Controller
Complex Embedded
Computer
Ex: Mobile Phone
Processor
(Bus Width)
High end processor
32 bit/ 64 bit
Ex: Intel Processor
Low End Processor
8 bit/16 bit
Ex: 8051 (8 bit)
ARM Cortex M4
High end processor
32 bit/ 64 bit
Ex: ARM Cortex A9
CISC or RISC
CISC
RISC
RISC
Caches and MMU
Yes
No
Yes
Memory
2GB to 64 GB
32KB to 128 MB
128 MB to 4GB
Multiprocessor
Supports Dual Core/ Quad Core/ Hexa Core
Doesn’t support Multicore
Supports Dual Core/ Quad Core/ Hexa Core
Sensors
Doesn’t Support Sensor interface
Support Sensors Interface
Support High end sensors interface
External Device Interface
Supports
Once Device manufactured, can’t interface new device to the target.
Once Device manufactured, can’t interface new device to the target.
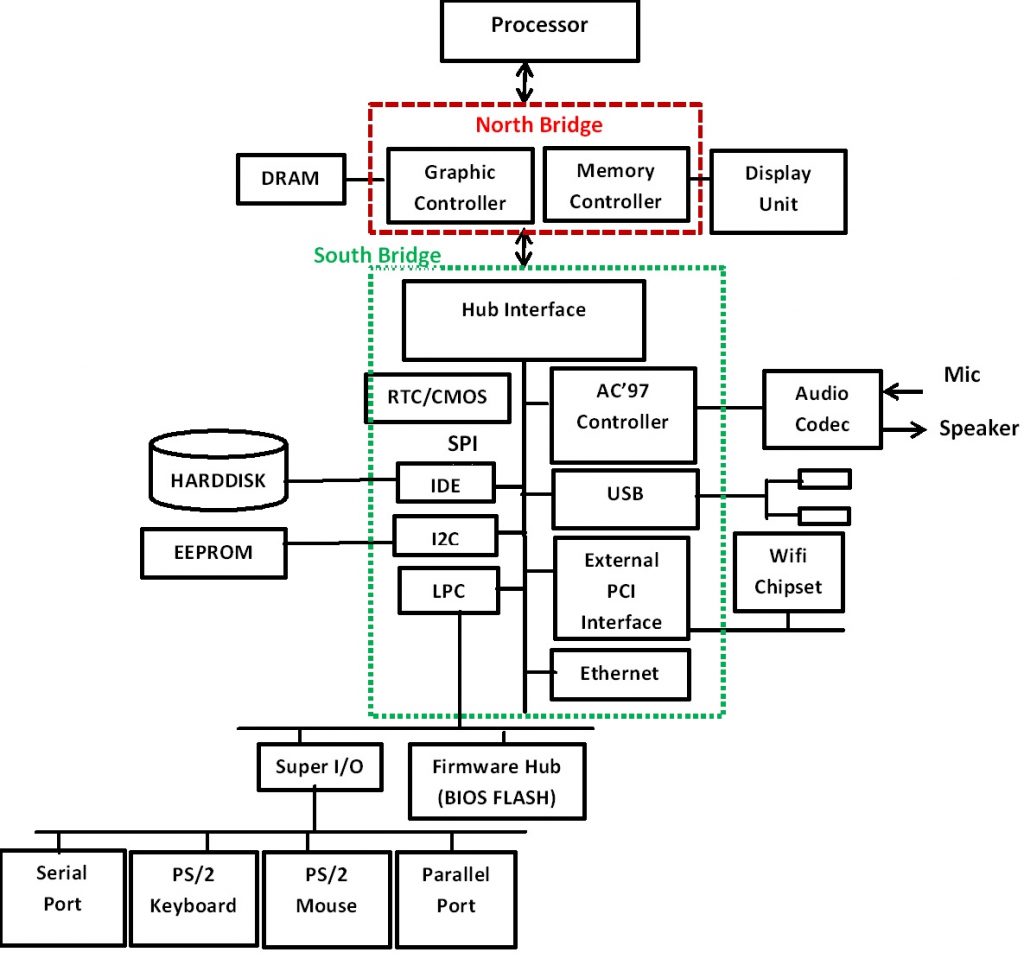
Desktop Block Diagram:Simple Embedded Systems Block Diagram: (Remote Controller)Complex Embedded systems Block Diagram (Example: Mobile Phone)
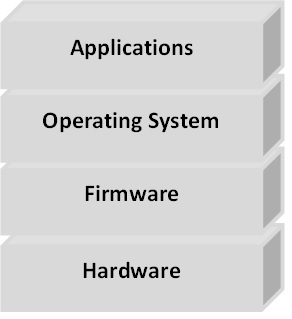
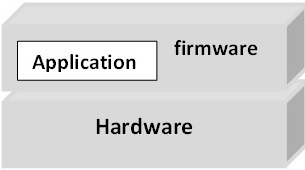
Embedded Software
Software Layers in the Computer
Software Required
Desktop Computer
Simple Embedded
Computer
Ex: remote Controller
Complex Embedded
Computer
Ex: Mobile Phone
Software layers in the Computer
Operating System
Windows/Linux
Doesn’t Support OS.
Supports Windows/Linux/Android
Firmware
BIOS
Whole system develops using firmware
Bootstrap program
Programming Languages
C/C++/Java/html/
php
Assembly/C
Assembly/C/C++/Java/
html/php
At the lowest level are programs that are run by the processor when the computer first powers up. These programs initialize the other hardware subsystems to a known state and configure the computer for correct operation. The software, because it is permanently stored in the computer’s memory, is known as firmware.
Above the firmware, the operating system controls the operation of the computer.
Firmware:
Firmware is software that is programmed into chips permanent/temporary and usually performs basic instructions, like BIOS, for various components, Network cards, and computer BIOS, etc…
Embedded C Programming is also called Firmware.
Embedded C vs General C:
C is a widely used general purpose high level programming language mainly intended for system programming.
Embedded C is an extension to C programming language that provides support for developing efficient programs for embedded devices.
Embedded C has to use with the limited resources, such as RAM, ROM, I/Os on an embedded processor.
Operating System
An operating system (OS) is system software that manages computer hardware and software resources and provides common services for computer programs.
Kernel
Kernel is core part of the operating system. Kernel provides core service like Process management, Memory management, File management, Device and network services.
To all the students who are looking forward to take Engineering admission, and to their parents, we would like to give some suggestions about branch selection.
There is no doubt that every student’s first choice is Computer Science only.But, to bring awareness in students, about the enormous opportunities provided by electronics field and about its importance and to encourage them to choose Electronics field, is the main agenda of this blog post.
Why is there so much demand for Computer Science Engineering?
Due to the salaries and lifestyle provided by software industry, not only the students, their parents are also attracted to this field.
Nowadays situation has become such that, job means only software engineer job, engineering means only computer engineering, nothing else is considered good.
As lot of people compete for Software Engineering jobs, only few of them get proper development opportunities.Remaining candidates just end up doing maintenance & support kind of jobs with no proper career growth.
What is the importance of Electronics branch in Engineering?
Nowadays mobile phone has become the basic necessity of human life along with food, clothes and shelter.
We cant imagine life without smart phone.
We cant find a house without atleast one electronic device. There will be atleast a TV and a Set top box to say minimum.
How are these electronic devices made?
Electronic core fields like Embedded Systems & VLSI design and manufacturing fields are the ,main reason that we have all these devices.
Electronics field is no way inferior to Software field in terms of Job opportunities.
Most of the Electronics students are not aware of the opportunities provided by Electronics field, so they are either choosing Software field or moving on to higher studies etc.
As long as the situation is like this, we will have to import every electronics device that we need, from other countries like China or Japan.Make In India can never become reality.
What are the new courses added to Computer science branch, and what are the consequences of adding them?
In this academic year (2020-2021), 6 new engineering courses were added to the computer science department.
Most of the subjects in these courses are taken from the Computer Science Standard Curriculum.They should have been added as Specialisations in M.Tech instead of adding as new branches in B.Tech.
Because of adding these new branches in B.Tech, approximately 19000 new seats got added to Computer Science department alone.Because of the increased seats, most of the students will opt for Computers branches, which will effect core fields like Electronics Civil, Mechanical etc.
As these core fields get effected as no one is opting for them, the technology advancements in these fields will be hindered.If you see countries like China or Japan, they are technologically very advanced.
Why are these countries so developed? Because they give equal importance to all core fields, not just one field. That is why now they are in a stage to manufacture anything on their own and export it to other countries.
Because of the newly added seats in computer science department, all students will tend to choose Computer science branch only.
But we need to understand that increase of seats in a particular field does not mean increase in job opportunities. It means competition is increasing in that field.
One more thing is, technologies like Artificial Intelligence & Machine Learning are no doubt in demand, but these technologies have to be used in electronic devices only.So inorder to use these advanced technologies, we will require electronics basic knowledge.
Which means, Electronics field will continue to provide job opportunities and there will be demand for skilled resources.
So is it right that everyone chooses software field, leaving such an evergreen field like Electronics?
What I want to tell to students and their parents is,choose the field which provides good job opportunities, growth in career along with good salaries and job satisfaction. Choose Electronics Core field.
Let us together pledge to save the electronics core field branches like ECE & EEE. And make “Make In India” possible.
For Freshers, the resume should be mainly about their skill-set and academic details. Here are some tips about how to build your resume, section wise.
Career Objective Section:
It is absolutely unnecessary. The Career objectives are just like heritage carried from your senior’s CV’s to your CV, then to your junior’s. You can safely remove it as it is nothing but copy paste.
If you have something of your original, that reflects your real career motto or attitude, you may add it, just to bring some interest.
Technical Summary:
Add a line in technical summary about training attended at Kernel Masters. Course name is Certified Industrial Embedded Systems Developer training.
Or add any other relevant course that you have attended at any institute.
Update the skillset or technical summary section with whatever topics you learnt at Kernel Masters, or implemented, like socket programming, inter process communication etc.
You may also add the major subjects studied in technical summary/skillset, like C Programming, Embedded C with STM32, Operating System concepts, Git, GDB , KGDB etc.
Protocol names must be mentioned.
Sometimes it may be required that you have to update your technical skillset based on the company’s requirement and Job Description. So keep visiting this section from time to time and update.
Projects:
Add the embedded C project done at Kernel Masters, to your profile above your academic projects.
Add Project Title first.
Add project abstract / description. Add this in your own words, to reflect how you understood the project in general words. Include some key technical words that help describe the project.
Do not copy paste project description from anybody else.
Quality is more important than quantity when it comes to projects. You will be validated based on how much practical implementation you have done on one project with perfect understanding, than how many projects you have done.
Add the responsibilities handled by you and the technologies & protocols used.
Under responsibilities you will have to add details like ,data sheet study, any kind of analysis done, sensors studied etc in bullet points.
Academic project should be added only if you are able to explain about it in interviews.
Experience Summary:
Add your experience or internship details if any only if it is related to Embedded field.
Add companyname, designation and duration for which you have served at the company.
Do not add teaching experience or experience from any other field that is not relevant to Embedded Industry.
Education Details:
Academic percentages, branch or specialization and passedout years are mandatory in education details.
Also add the university and college names for graduation and post graduation.
Personal Details:
Personal details section is not usually required if you are providing your residential address at the top.
If you want to provide, put your date of birth & Residential address. Family details are not required.
Contact Information:
Add a valid mobile number and a mail id that you regularly use and check. The mobile number that you provide in resume, must always be available.
Make sure your email id that you provide has a professioal looking user name that shows your full name as part of it.
Do not use any unprofessional & funky mail ids like mylifemywish@gmail.com.
Better to add your residential address to give the employer an idea of your current location, there by decide the mode of interview.
Add your SkypeId.
Other Key points to Note:
Name your resume file in this format “FullName_Fresher/x+exp” Full name is mandatory. Never name it like “my_resume”, “resume”,”resumeupdated” etc. Resumes wrongly named will be discarded.
Send only word documents to me, if you are under my placement assistance program (only for Kernel Masters students).
The Linux community World wide contains many students who are developing the code either out of Interest or as part of their academic projects.
But most of the colleges doesn’t have the proper environment suitable for Open Source Projects (Except for top most colleges like IITs/NITs). The students in those colleges don’t get any guidance on how to start with open source projects.
That is what we are implementing in our course, “Android for Embedded Systems” where we are going to make students do some real-time projects that are based on Linux / Android open source code.We also have academic projects for B.Tech / M.Tech students that are purely based on Linux / Android open source code.
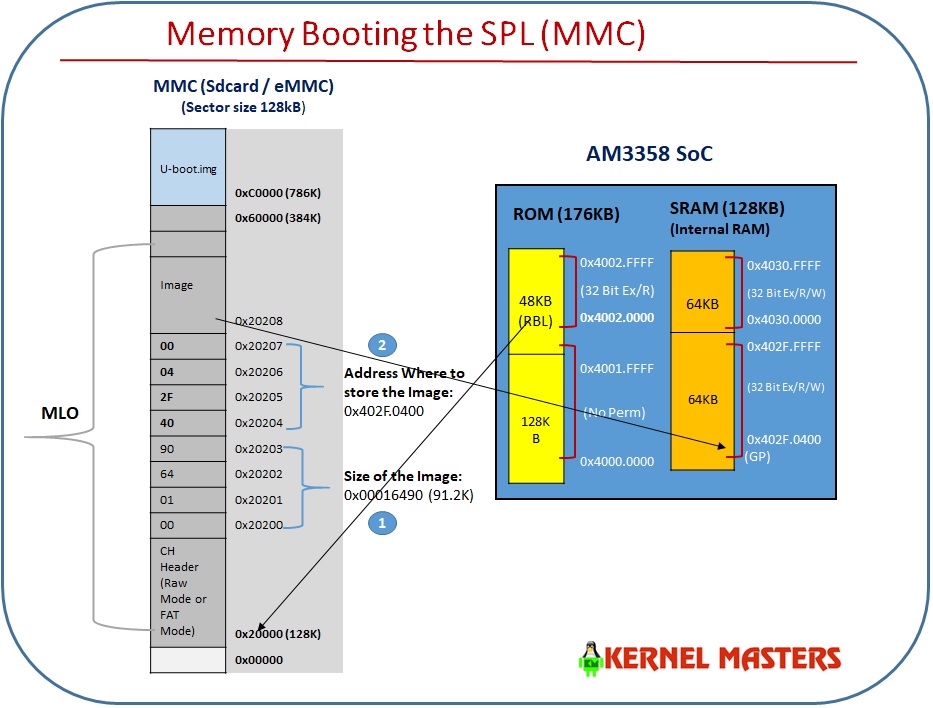
In AM335x the ROM code serves as the bootstrap loader, sometimes referred to as the Initial program Loader (IPL) or the Primary Program Loader (PPL) or ROM Program Loader (RPL).
The booting is completed in two consecutive stages by U-Boot binaries.
The binary for the 1st U-Boot stage is referred to as the Secondary Program Loader (SPL) or the MLO.
The binary for the 2nd U-Boot stage is simply referred to as U-Boot. SPL is a non-interactive loader and is a specially built version of U-Boot. It is built concurrently when building U-Boot
Memory Booting: Booting the device by starting code stored on permanent memories like flash-memory or memory cards. This process is usually performed after either device cold or warm reset. Peripheral Booting: Booting the device by downloading the executable code over a communication interface like UART, USB or Ethernet. This process is intended for flashing a device.
Booting the SPL
The ROM code can load the SPL image from any of the following devices:
Memory booting with MMC
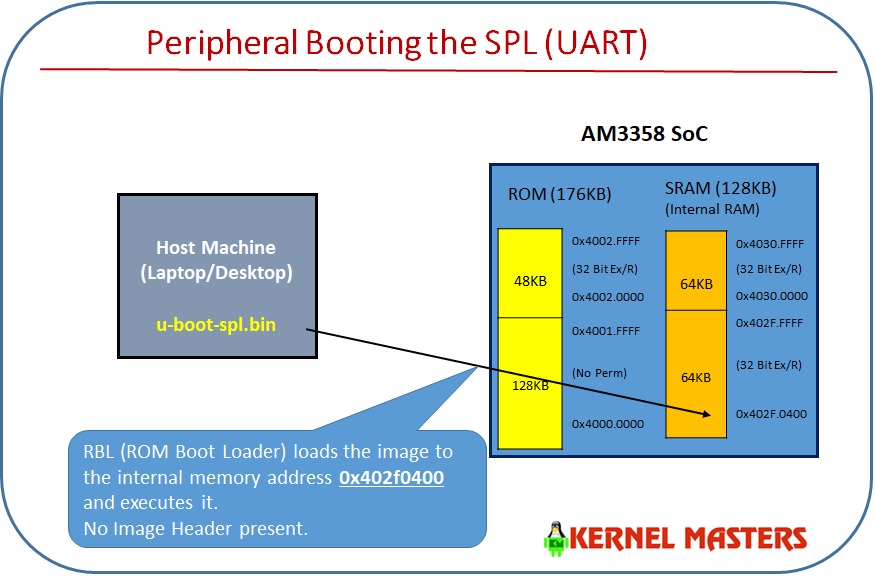
Peripheral booting with UART
1. Memory Booting with MMC
The image should have the Image header. The image header is of length 8 byte which has the load address (Entry point) and the size of the image to be copied. RBL would copy the image, whose size is given by the length field in the image header, from the device and loads into the internal memory address specified in the load address field of Image header.
When using memory boot a header needs to be attached to the SPL binary indicating the load address and the size of the image. SPI boot additionally requires endian conversion before flashing the image
The ROM Code supports booting from MMC / SD cards in the following conditions:
MMC/SD Cards compliant to the Multimedia Card System Specification and Secure Digital I/O Card Specification of low and high capacities.
MMC/SD cards connected to MMC0 or MMC1.
Support for 3.3/1.8 V on MMC0 and MMC1.
Initial 1-bit MMC Mode, optional 4-bit mode, if device supports it.
Clock Frequency: identification mode: 400 KHz; data transfer mode up to 10 MHz.
File system mode (FAT12/16/32 supported with or without Master Boot Record), image data is read from a booting file.
Raw mode, image data read directly from sectors in the user area.
In raw mode the booting image can be located at one of the four consecutive locations in the main area offset 0x0 / 0x20000 (128KB) / 0x40000 (256KB) / 0x60000 (384KB).
2. Peripheral Booting with UART
RBL loads the image to the internal memory address 0x402f0400 and executes it. No Image Header present.
When using peripheral boot (UART) there can be no header as the load address is fixed.
The ROM Code supports booting from UART in the following conditions:
UART boot uses UART0.
UART0 is configured to run at 115200 baud, 8-bits, no parity, 1 stop bit and no flow control.
UART boot uses x-modem client protocol to receive the boot image.
Utilities like hyperterm, teraterm, minicom can be used on the PC side to download the boot image to the board.
With x-modem packet size of 1K throughout is roughly about 4KBytes/Sec.
The ROM code will ping the host 10 times in 3s to start x-modem transfer. If host does not respond, UART boot will timeout.
Once the transfer has started, if the host does not send any packet for 3s, UART boot will time out.
If the delay between two consecutive bytes of the same packet is more than 2ms, the host is requested to re-transmit the entire packet again.
Error checking using the CRC-16 support in x-modem. If an error is detected, the host is requested to re-transmit the packet again.
Bootloader Images:
Image Name
Image Size
Image Header
Purpose
spl/u-boot-spl
2.2M
No
The binary of SPL ELF Image.
spl/u-boot-spl.bin
91264 Bytes
No
The second-stage bootloader (a stripped down version of u-boot that fits in SRAM).
spl/u-boot-spl.map
227K
No
contains the information for each symbol.
MLO
91784 Bytes
Yes, GP Header
spl/u-boot-spl.bin with a GP image header prepended to it.
U-boot.bin
474K
No
is the binary compiled U-Boot bootloader
u-boot.map
674K
No
contains the memory map for each symbol
U-boot.img
474K
Yes. GP header
contains u-boot.bin along with an additional header to be used by the boot ROM to determine how and where to load and execute U-Boot.
Use this guide to prepare your Linux development environment, find course resources and move into BeagleBone Black practicals when Level 2 begins. Follow your instructor’s batch-specific directions for hardware and builds.
Level 1 covers Linux basics, shell scripting, Linux System Programming and driver foundations. No development board is required at this stage.
Install now
Set up Kernel Masters OS
The official installation guide covers laptop requirements, KM OS version selection, VirtualBox, the matching Extension Pack, import, troubleshooting and first-boot checks.
Course prerequisite: C Programming and Data Structures. The playlists below are helpful Linux primers to study alongside your C preparation.
02
Build your foundations with free primers
Watch these public Kernel Masters playlists and practice the examples in your KM OS terminal. Course assignments and the batch learning sequence will be shared separately.
Level 2 moves into BeagleBone Black practice, the KM expansion board, bootloader and BSP work, kernel customization, drivers, Yocto, debugging and projects. Both boards are required for the practicals; the BeagleBone Black may need to be purchased separately.
Required board test
Test the board when it arrives
Complete the BeagleBone Black and KM expansion board diagnostic test using the procedure shared by the KM team. Report any fault through the official support channel before moving to other board experiments.
Board diagnostic walkthrough
04
Level 2 build instructions
The existing KM-BBB U-Boot and kernel steps are kept here for this release. Use the versions and workflow confirmed by your instructor for your batch.
Before installing to an SD card: Confirm the correct /dev/sdX device. Choosing another disk can overwrite its data. Complete the required board test first.
U-Boot 2019.04 — source, build and install
1. Download the source
cd ~/KM_GITHUB/
git clone https://github.com/kernelmasters/beagleboneblack-uboot.git
cd beagleboneblack-uboot
2. Configure and build for KM-BBB
km-bbb-uboot-build.sh
The existing guide identifies the generated boot images as MLO and u-boot.img. It describes u-boot.bin as the compiled U-Boot binary.
3. Install using your instructed method
SD card:
./km-bbb-uboot-install.sh --mmc /dev/sdX
Network (TFTP):
./km-bbb-uboot-install.sh --board X
Replace X only after verifying the SD-card device or KM-BBB board number.
Kernel 4.19.94 — source, build and install
1. Download the source
cd ~/KM_GITHUB/
git clone git@github.com:kernel-masters/beagleboneblack-kernel.git
cd beagleboneblack-kernel
2. Configure and build for KM-BBB
km-bbb-kernel-build.sh
The existing guide identifies vmlinux as a generated image and lists vmlinuz, device-tree blobs and modules for SD-card installation.
3. Install using your instructed method
SD card:
./km-bbb-kernel-install.sh --mmc /dev/sdX
Network (TFTP):
./km-bbb-kernel-install.sh --board X
These commands are reproduced from the existing article. Confirm the kernel repository path and versions with your instructor.
05
Your code and learning resources
Keep the official source library and your course dashboard easy to find throughout both levels.
Kernel Masters GitHub
Explore public Embedded Linux, BeagleBone Black, U-Boot, kernel and related project repositories. Use the revision your instructor specifies for your module.
Login credentials are shared during an upcoming online interactive session. Interactive-session recordings are not part of standard course delivery; follow your batch policy.
06
Readiness checklist and support
Prepare your learning environment first. Complete the board test and confirm the build workflow when Level 2 hardware work begins.
Before Level 1 practicals
KM OS installed from the official guide
Desktop, terminal and internet verified
Git, GCC and Make checked
C and Data Structures reviewed
Primers and KMLearnX bookmarked
Before Level 2 practicals
Level 1 foundations completed
BeagleBone Black and KM expansion board available
Required board test completed
Instructor’s build versions confirmed
SD-card device or board number verified
Need help with setup or board testing?
Contact the KM team through the official student WhatsApp channel using your registered number, or email your batch details, exact error and a screenshot.
The standardized learning and development environment for Kernel Masters students
KM OS 3.0 is a customized Ubuntu-based environment prepared for Kernel Masters practical sessions. It helps students avoid repeated setup issues and begin learning with a tested, course-ready system.
Ubuntu-based VirtualBox-ready Course-focused setup Ready after import
Why it existsTo reduce dependency, package and configuration problems during practical learning.
Who should use itKernel Masters students working with Linux-based tools, programming and embedded development workflows.
Main benefitInstall once, verify once and continue learning in a common tested environment.
01 · Version Selection
Choose the Right KM OS Version and System Requirements
Before downloading KM OS, choose the version that matches your laptop configuration.
A smooth VM experience depends mainly on RAM, CPU cores, disk space and virtualization support.
Check it in Task Manager > Performance
Recommended for most students
KM OS 3.0
Best for students with 8 GB RAM or above and
more than 4 CPU cores.
Recommended for current Kernel Masters practical workflows
Better suited for latest course tools and configurations
Ideal for smoother builds, terminal work and multitasking
Important:
Do not mix different VirtualBox and Extension Pack versions. If VirtualBox is version
7.x.x, the Extension Pack should be the same 7.x.x release.
A mismatch may affect USB, shared folders, clipboard sharing, display resizing and other guest features.
02 · Installation
Download and Install KM OS in VirtualBox
This is the main installation flow. Keep the downloaded KM OS file, VirtualBox installer and matching Extension Pack ready before starting.
Expected setup time: A compatible system can usually complete the installation and first boot verification within a short practical setup session. Download speed and laptop performance may affect the total time.
03 · Troubleshooting
Common Installation and Post-Installation Problems
This section is written for students who are installing KM OS for the first time. Find the problem closest to what you see, follow the quick fix, and then use the detailed steps below when required.
Before trying fixes: do one change at a time. Avoid random online commands. Note the exact error message, VirtualBox version, Extension Pack version and KM OS version before asking for support.
Quick problem finder
Problem seen by student
Most likely cause
What to do first
VT-x / AMD-V error
Virtualization is disabled in BIOS/UEFI
Enable Intel VT-x or AMD-V/SVM and restart Windows
64-bit guest option is missing
Virtualization disabled or Windows hypervisor conflict
Enable virtualization and review Windows virtualization settings
OVA import fails
Incomplete download, corrupted image or low disk space
Re-download the OVA and confirm free disk space
VM starts but runs very slowly
Low RAM, too many host apps, HDD storage or weak CPU allocation
Close heavy apps, use SSD and allocate resources carefully
No internet inside KM OS
VirtualBox network adapter or host network issue
Check adapter setting and restart the VM
Shared folder is not visible
Guest Additions or folder permission issue
Check shared-folder settings and Guest Additions
USB device is not detected
Extension Pack mismatch or USB not attached to the VM
Install matching Extension Pack and select the USB device from VirtualBox
Screen resize / clipboard stopped
Guest Additions modules are not active after kernel update
Rebuild or reinstall Guest Additions
Detailed fixes for common issues
1. VT-x / AMD-V error or 64-bit option missing
Symptoms: VirtualBox shows a VT-x/AMD-V error, KM OS does not start, or the 64-bit guest option is missing.
Shut down Windows completely and restart the laptop.
Enter BIOS/UEFI setup using the key shown by your laptop manufacturer.
Enable Intel VT-x, Intel Virtualization Technology, AMD-V or SVM Mode.
Save BIOS/UEFI changes and boot into Windows again.
Open VirtualBox and start KM OS.
If the 64-bit option is still missing, Windows hypervisor features may be interfering. Check this with the Kernel Masters support team before making major Windows changes.
2. OVA import fails or import takes too long
Symptoms: import stops midway, the image is not accepted, or VirtualBox reports an appliance import error.
Confirm that the file is fully downloaded and has the expected .ova extension.
Do not import directly from a partially downloaded file or unstable external drive.
Keep sufficient free disk space before importing. VM import needs extra working space during extraction.
Move the OVA file to a simple local path such as D:\KMOS or C:\KMOS.
Restart VirtualBox and try File → Import Appliance again.
If the same error repeats, download the OVA again from the official Kernel Masters source.
3. KM OS starts but runs slowly
Symptoms: slow boot, lagging mouse, terminal delay, browser freezing or long build time.
Close heavy Windows applications before starting the VM.
Use SSD storage wherever possible. Running a VM from HDD can be very slow.
Do not allocate all host RAM to the VM. Windows also needs memory to run smoothly.
Allocate CPU cores carefully. A 4-core laptop should not give all cores to the VM.
Avoid running multiple VMs at the same time on low-RAM systems.
Create a snapshot only after the VM becomes stable and verified.
If performance is still poor, use the lighter KM OS version recommended for low-spec systems.
4. No internet inside KM OS
Symptoms: browser does not open websites, apt update fails, Git clone fails or the network icon shows disconnected.
Confirm that internet works on Windows first.
Shut down KM OS, open VM settings and check whether Network Adapter is enabled.
Use the network mode recommended by Kernel Masters for your course setup.
Start KM OS again and test the browser.
Open terminal and test basic connectivity:
ping -c 4 8.8.8.8
ping -c 4 google.com
If the first command works but the second fails, it may be a DNS issue. Share the output with support.
5. Shared folder is not visible inside KM OS
Symptoms: Windows shared folder is missing, files are not accessible, or permission is denied.
In VirtualBox, open VM settings and confirm that the shared folder is added.
Enable auto-mount if that is part of the Kernel Masters setup.
Start KM OS and check the shared-folder location provided by the trainer.
Confirm that Guest Additions are active.
If permission is denied, the Linux user may need access to the shared-folder group:
groups $USER
sudo usermod -aG vboxsf $USER
sudo reboot
After reboot, check the shared folder again. Do not change random permissions on system folders.
6. USB device is not detected in KM OS
Symptoms: development board, USB-to-serial adapter or storage device is visible in Windows but not inside KM OS.
Install the VirtualBox Extension Pack matching the VirtualBox version.
Shut down KM OS and open VM USB settings.
Enable the USB controller recommended by Kernel Masters.
Start KM OS and connect the USB device.
From the VirtualBox menu, select Devices → USB and attach the required device to the VM.
Inside KM OS, check whether the device is detected:
lsusb
dmesg | tail -30
If Windows captures the device again, disconnect and reconnect it, then attach it from the VirtualBox USB menu.
7. Screen resize, clipboard or drag-and-drop stopped working
Symptoms: full-screen mode does not resize properly, shared clipboard stops, drag-and-drop fails or the display remains fixed after a Linux kernel update.
This usually means VirtualBox Guest Additions kernel modules need to be rebuilt for the currently running Linux kernel.
If the issue continues, manually reinstall Guest Additions using the ISO method below.
8. Manually reinstall Guest Additions from ISO
From the running VirtualBox window, select:
Devices → Insert Guest Additions CD Image
Then run inside KM OS:
cd /media/$USER/VBox_GAs_*
sudo sh ./VBoxLinuxAdditions.run
sudo reboot
If the ISO does not mount automatically, use this manual mount method:
sudo mkdir -p /mnt/vbox-guest-additions
sudo mount /dev/cdrom /mnt/vbox-guest-additions
cd /mnt/vbox-guest-additions
sudo sh ./VBoxLinuxAdditions.run
sudo reboot
If installation fails, share the error from this log with support:
/var/log/vboxadd-setup.log
Support tip: When reporting an issue, send the screenshot, exact error message, laptop RAM/CPU details, VirtualBox version, Extension Pack version, KM OS version and the output of uname -r. This helps the trainer identify the problem faster.
04 · Safe Usage
Snapshots, Updates and Recovery
Virtual machines are useful because students can experiment, make mistakes and return to a working state quickly.
When to create snapshots
After first successful installation
After verifying internet and tools
Before kernel updates
Before major package changes
Before risky experiments or projects
Safe update guideline
Do not update KM OS immediately before an important practical session.
Take a snapshot before VirtualBox, Guest Additions or kernel-related changes.
If display, clipboard or shared folders fail after updates, rebuild or reinstall Guest Additions.
Snapshot note: A snapshot helps you return to a previous VM state quickly, but it is not a replacement for a complete backup or exported VM copy.
05 · Alternatives
Native Ubuntu, VMware and Common Questions
KM OS is recommended because it gives students a tested setup. Students with strong Linux administration skills may still choose other paths.
Native Ubuntu
Students may use native Ubuntu if they can install packages, configure tools and maintain compatibility themselves.
VMware
KM OS may be importable in VMware, but Oracle VirtualBox is the officially recommended and tested platform for Kernel Masters practical sessions.
Frequently Asked Questions
Is KM OS only for Embedded Linux students?
No. KM OS is prepared as a standardized Linux-based learning environment for Kernel Masters students wherever the course requires Linux tools, programming, embedded development or system-level workflows.
Is KM OS a separate Linux distribution?
No. KM OS is an Ubuntu-based environment customized with tools, packages and configurations required for Kernel Masters practical learning.
Can I install additional software?
Yes. KM OS behaves like Ubuntu. However, major upgrades or package changes should be done carefully because they may affect course compatibility.
Should I update KM OS during the course?
Apply only recommended updates. Avoid uncontrolled upgrades before practical sessions. Always create a snapshot before major system or package changes.
Where should I get support?
Use the official Kernel Masters student-support channel and share the exact error message, screenshot, VirtualBox version, Extension Pack version and KM OS version.
Final Checklist Before Your First Practical Session
After the first successful boot, verify the environment before attending practical sessions. This prevents avoidable issues during class.
KM OS desktop opens successfully
Keyboard and mouse work properly
Internet connection works inside KM OS
Terminal opens without errors
Shared folder is accessible, if configured
Screen resolution adjusts properly
Git, GCC and Make are available
Required course tools open correctly
System date and time are correct
A clean snapshot is created after verification
Basic verification commands
lsb_release -a
uname -r
gcc --version
make --version
git --version
Optional checks for Embedded Linux students
arm-linux-gnueabihf-gcc --version
Spend your time learning, not configuring. Install once.
Learn consistently. Build more.
1. Some Insights on the current situation of COVID-19
Life is the most precious gift. And the most valuable resource is time. Fortunately all of us have both of them right now. We have plenty of time that we can utilize in a productive way to lead our lives into a brighter future.
We live in a society where the safety of every life is of utmost importance to everyone else. Only we happened to realize it recently. It is a kind of positive change that happened because of COVID-19. However the responsibility to keep ourselves safe from the Pandemic lies in our own hands. We can do so by engaging ourselves in some activities which will help us to move towards a sustainable career by staying indoors safely.
The situation has brought many tragedies, but in a way it has also done some good to the nature and also to our lives. Now all we have to do is to stay safe,keep the good changes, come out of this situation clean & Healthy along with our near & dear ones. While we are doing this, it is also a good chance for us to prepare for a better future.
2. Stay Home. Stay Safe. Do not Panic!
By PANIC, we mean the fear of future. What will be the situation after the lockdown? The Corona Virus Pandemic has affected many developed & Developing countries and it has hit them in a really bad way. The countries will take some time to come out of the financial crisis caused by the present situation and the loses incurred by the companies is also huge. All this negativity is going to hit the job market and we might face some difficulties, which might be called by the dreaded name “RECESSION”.
However, my suggestion is , DO NOT PANIC. Be POSITIVE. Every Crisis brings some opportunities too, we only have to identify and grab on time. Especially there is a lot of scope for Embedded Solutions in health industry right now and in coming future.
Students from the upcoming pass out years must be in a blank state of mind, currently, with absolutely no idea about what is going to happen once they are out. It is not my intention to give some future predictions but we would give some suggestions using which, students will have some direction to think in and to seek guidance from someone at least. We have some suggestions for them to cope with this situation.
3. Career Opportunities
Will the Embedded Industry remain same before and after COVID-19 crisis?
I am a ECE 2019/2020 graduate? What opportunities can I expect after COVID-19 crisis?
How to utilize the lockdown period and get ready for the Industry past COVID-19?
These are some questions that must be running in the heads of the Engineering graduates right now.It is Universal Truth that Right Skill and Hard work will never go waste. Even if the world is at a crisis right now, it has to still run.
There will be companies, Industries and jobs. But the numbers might be slightly less compared to the situation before. But they will never be ZERO. This means there will be more competition, which in turn becomes more demand for the right skillset.
Hiring is not going to stop. But hiring will be based on worth of the candidate, because there will be more number of candidates available per position. So your job as a student during this time will be to increase your WORTH.
The COVID-19 situation has actually opened doors to new possibilities in technologies like Artificial intelligence, Block Chain, Embedded Systems etc.
Right now there is huge requirement for Innovative products to deal with this crisis in a better way, in the Health Industry. For example Ventilators, contact less temperature sensors, COVID-19 patient data tracking systems etc.
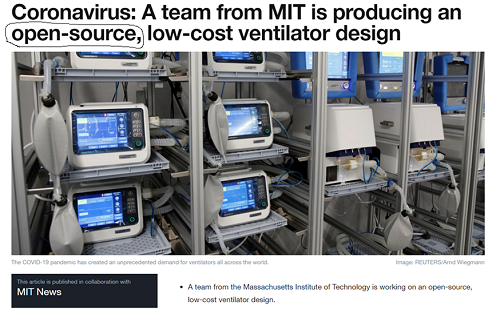
There is also requirement for time & cost effective solutions in development countries like India. Which brings in greater opportunities for Open Source Technologies. For example, there is a sudden demand for ventilators due to Corona virus disease spread, but there is not enough supply. As a quick solution, Open Source Ventilator development is one of the ongoing projects.
This course is designed for working professionals who want to build a strong foundation in C Programming and Data Structures. Starting from the fundamentals, the course focuses on practical programming, problem solving, pointers, strings, memoryconcepts and core data structures — helping learners strengthen their programming skills and prepare confidently for technical interviews.
Course Objective
Build in-depth knowledge of C Programming from the fundamentals
Gain hands-on experience with core C programming features
Develop a strong understanding of pointers, strings, arrays and memory concepts
Improve problem-solving and programming skills
Become interview-ready for C Programming technical rounds
This course is designed for working professionals who want to build a strong foundation in C Programming and Data Structures. Starting from the fundamentals, the course focuses on practical programming, problem solving, pointers, strings, memoryconcepts and core data structures — helping learners strengthen their programming skills and prepare confidently for technical interviews.
Course Objectives:
1. Build in-depth knowledge of C Programming from the fundamentals
2. Gain hands-on experience with core C programming features
3. Implement Data Structures using C
4. Improve problem-solving and programming skills
5. Develop a strong understanding of pointers, strings, arrays and memory concepts
6. Become interview-ready for C Programming technical rounds











 Admission for 6 months Embedded AI & IoT offline course at Hyderabad & Bangalore
 Course Fee: ₹12000 /-